His new girlfriend.

@JonS: ?????????? ok...

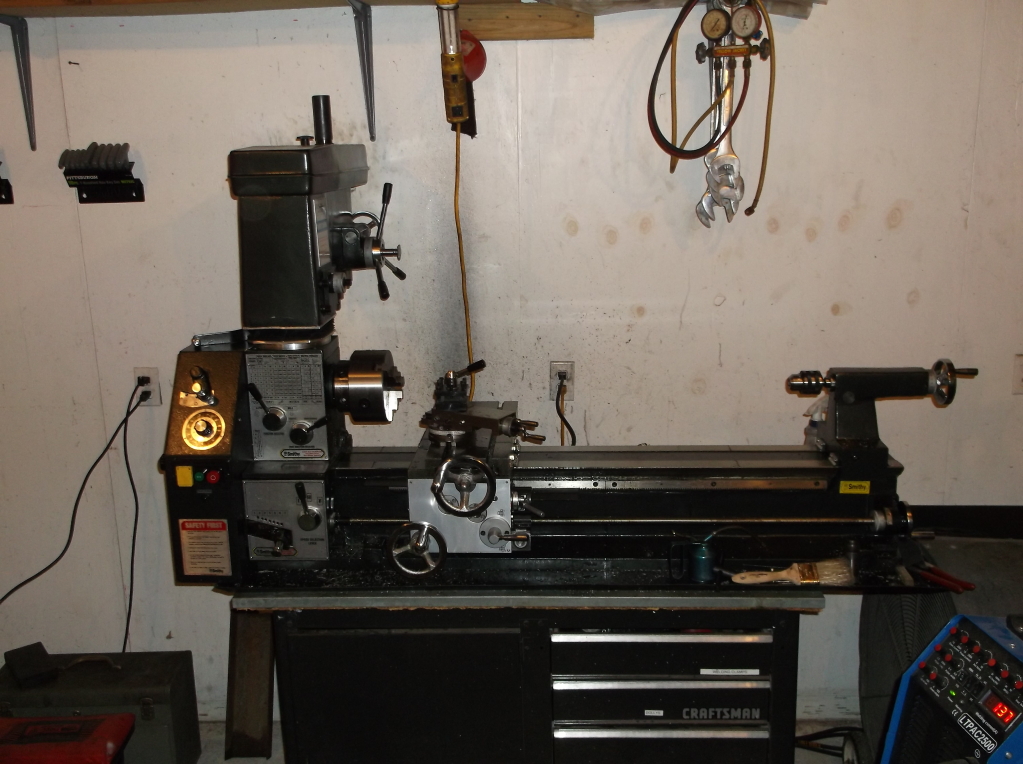
Here's the machine sitting in the garage, ready to go. I have it sitting on a workbench I don't like (and is really too small) and will be building a workbench from scratch to incorporate a full support, drawers, and a work bench area at the tailstock end.
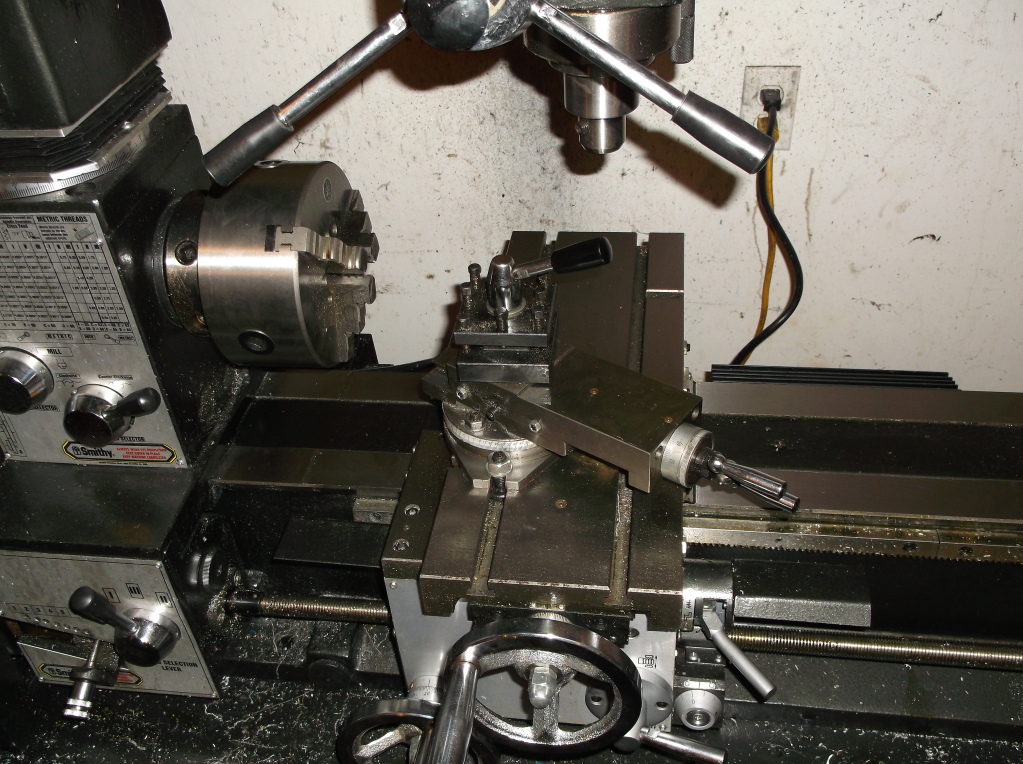
DSCF1164.jpg


Compound mounted:

DSCF1165.jpg


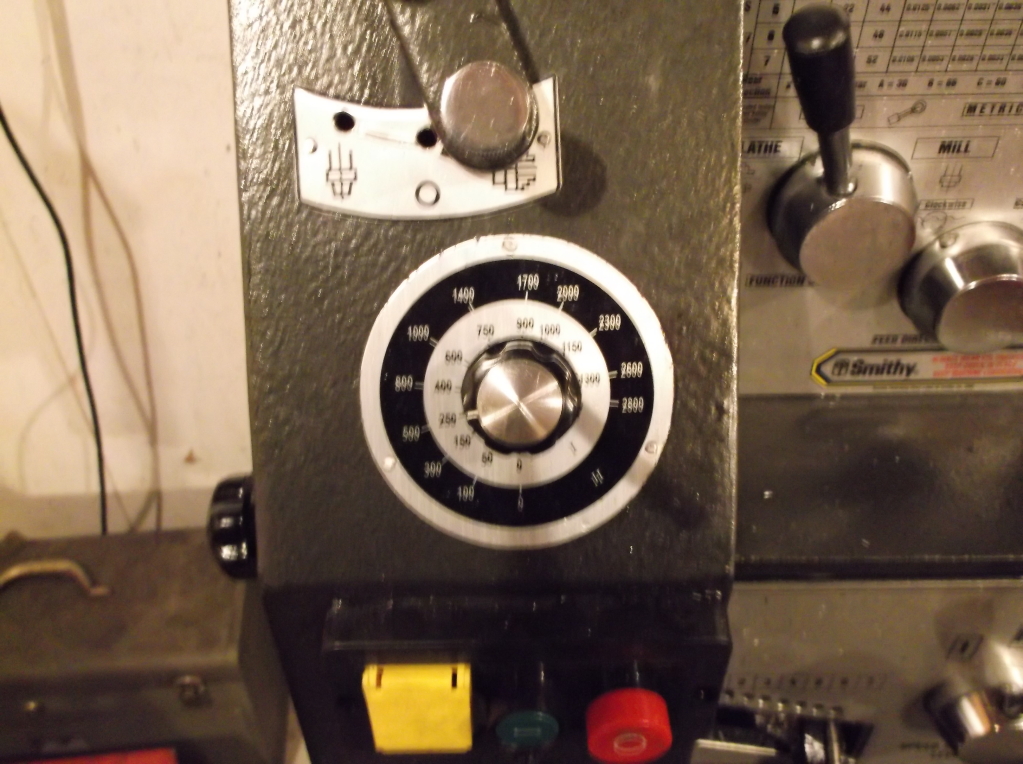
VFD controls. It has a belt from the motor to the spindle but only has two steps. Spindle speeds are 50-1300 and 100-2600.

DSCF1167.jpg


With the mast adjusted up for maximum clearance to the table.

DSCF1169.jpg


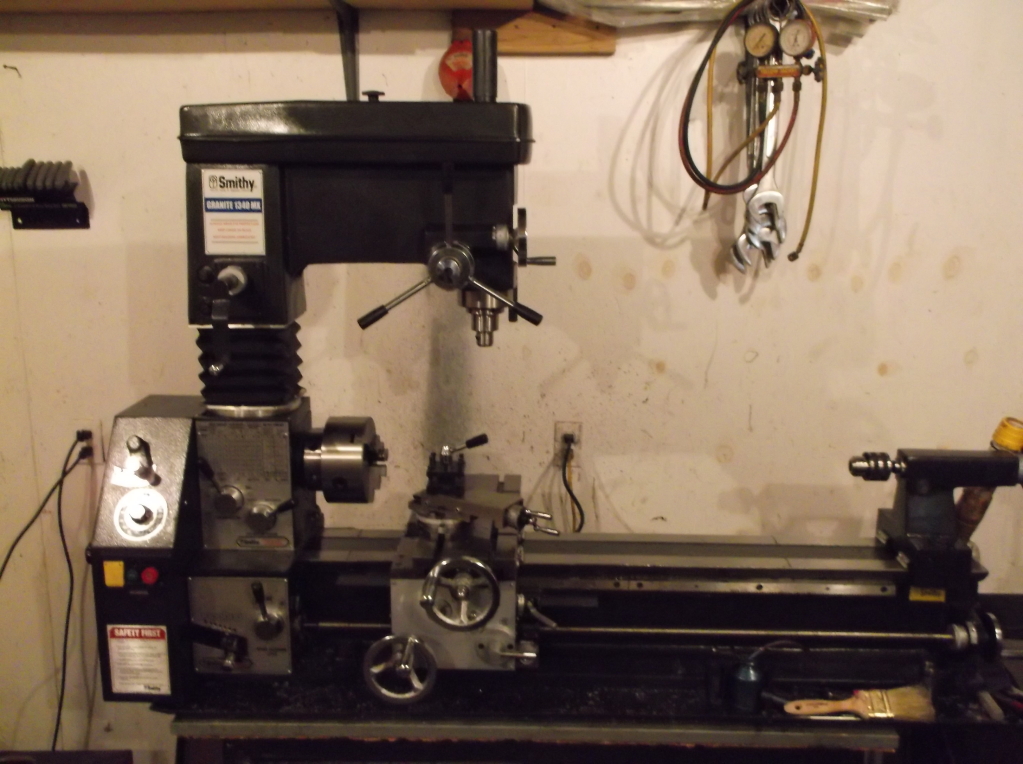
The milling head rotates around backwards to clear out the lathe area. It turns around 360 degress.
 
Sweet. Never seen a head cut that way!

Face milling simply to "lower" the head.

I *MAY* be building a banshee head mandrel but it needs to be counterbalanced to handle the offset weight. I have heard there's not a lot of room to work on a banshee stock head because there's not much room before you get into the coolant jacket itself. However, there is some room in there to improve....
 
Ok! I thought it would be in the three jaw spinning. I guess that's the mandrel your talking about?
 
Ok! I thought it would be in the three jaw spinning. I guess that's the mandrel your talking about?

In order to attach a banshee head to the lathe part you either need to attach it to a face plate and spin the whole thing (not centered around one spark plug hole or the other) or make an assembly that holds the head offset with one spark plug hole centered on the spindle center and the other end of the head swinging wildly. Without a counterbalance of some sort, the wildly swinging end COULD set the machine so far out of balance to cause trouble.
 
I see several things wrong with the process you’re using to cut the Banshee head.
1. Holding the head in a vice creates a pinch point at three places. This creates distortion of the head before machining and a non-parallel starting point (unless you smack the head around with an indicator as I’m sure you did.) The cutter will cut flat resulting in a warped head after machining and the pressure is released from the vice. Remember, a Banshee runs a steel head gasket. Any distortion will result in a leak for the customer and we don’t want that. The other problem is that the head will NEVER be held secure in the vice and it will move as its being cut. I’m sure you figured this out as evidenced by the jacking screws you’re using to keep the head from moving under the force of the cutter.

2. You can’t resurface a head, cylinder or anything else accuratly by taking multiple cuts across its face with a small diameter cutter. This operation needs to be done with one cut. You need a very big fly cutter set at a .0005 offset of the head to prevent back cutting. Those are the swirl marks you see on your head. From what I see, your machine has no provision for angling the head. You could tram the drill head and shim as needed to accomplish this. You can build a fly cutter with what you have. I built mine and it’s been working great for many years.

3. The set up is simple. A Banshee head has four points at the top. This is what the factory uses for their machining process and you should use them as well. Get rid of the vice and set the head on a set of 1” parallels. Use the four points and clamp the head on your compound by the spark plug holes. You may have to build tooling to do this but that’s what you’ll be doing for a long time. Once you have it, the rest is easy. This set up will not distort the head and its dead nuts to how the factory does it.

I’m not busting on you Boss but from what I just saw, you ruined that head. Congrats on the new machine and I hope it works out for you.
 
  • Like
Reactions: scotj77
I see several things wrong with the process you’re using to cut the Banshee head.
1. Holding the head in a vice creates a pinch point at three places. This creates distortion of the head before machining and a non-parallel starting point (unless you smack the head around with an indicator as I’m sure you did.) The cutter will cut flat resulting in a warped head after machining and the pressure is released from the vice. Remember, a Banshee runs a steel head gasket. Any distortion will result in a leak for the customer and we don’t want that. The other problem is that the head will NEVER be held secure in the vice and it will move as its being cut. I’m sure you figured this out as evidenced by the jacking screws you’re using to keep the head from moving under the force of the cutter.

2. You can’t resurface a head, cylinder or anything else accuratly by taking multiple cuts across its face with a small diameter cutter. This operation needs to be done with one cut. You need a very big fly cutter set at a .0005 offset of the head to prevent back cutting. Those are the swirl marks you see on your head. From what I see, your machine has no provision for angling the head. You could tram the drill head and shim as needed to accomplish this. You can build a fly cutter with what you have. I built mine and it’s been working great for many years.

3. The set up is simple. A Banshee head has four points at the top. This is what the factory uses for their machining process and you should use them as well. Get rid of the vice and set the head on a set of 1” parallels. Use the four points and clamp the head on your compound by the spark plug holes. You may have to build tooling to do this but that’s what you’ll be doing for a long time. Once you have it, the rest is easy. This set up will not distort the head and its dead nuts to how the factory does it.

I’m not busting on you Boss but from what I just saw, you ruined that head. Congrats on the new machine and I hope it works out for you.


With this head, I simply left some meat for "extended lapping" to take care of those problems. I did indicate it, the stock head (unlapped) wasn't even flat when I got it so I didn't have a "high bar" to hit to begin with.

The "jacking screws" are the vise hold down assembly. They're not touching the head at all, you just can't see that from the angles the pics were taken at. That head did not move one lick even though it is only "pinched" in the vise. I took approximately .006" per "slice" to be easy on it and keep it from trying to kick out.

I wasn't particularly happy with the vise method although it did work and plan on making a custom jig (already in the works at the time of this writing actually) however, in typical fashion, the knobs on top of the head were beaten badly which is why I didn't use those. I expect that many used heads will have the same condition...

My jig is a piece of 2"x5" 3/8" channel I transfer punched all of the head stud holes and spark plug holes down onto. I'm going to drill and tap the head stud holes and drill out and countersink the bottom of the spark plug holes. I'm going to cut studs and lock them to the channel using a jamnut and then install a nut on each of the studs to adjust the "height" of each stud. I'm going to make two spark plug "dummies" for the jig to hold the head down onto the channel. It will take a lot of adjusting I'm sure to get it level (that's what I have an indicator for!) but it won't have to use the (potentially) damaged stock machining studs.

I appreciate the advice, it's better than flying in the dark.
 
Last edited:
Sounds like a ton of work. If the four points are damaged, clamp the sealing surface of the head on the table (or compound) and trim them level with an end mill. Flip it over and it will be perfect with no adjustment needed. I'm sure others are going to try this so I'll shoot a vid today. The jig you're thinking of building would be great for a head where the sealing surface and plug hole aren’t perpendicular. Like the LT500.
 
Sounds like a ton of work. If the four points are damaged, clamp the sealing surface of the head on the table (or compound) and trim them level with an end mill. Flip it over and it will be perfect with no adjustment needed. I'm sure others are going to try this so I'll shoot a vid today. The jig you're thinking of building would be great for a head where the sealing surface and plug hole aren’t perpendicular. Like the LT500.

You think those 4 little studs are stronger than a stud in every mounting hole? Or is it just that they're "strong enough" to hold the head?

I don't mind the work to do the jig as I can use it in the future for more "experimental" work.
 
That one went over my head at first! But I get it now- feel like a blonde! Isn't nothing made in the usa anymore except welfare!
 
Im fine with they way it was done just that ken said it should all be removed at once. Lapping doesnt do that and people lap all the time. Just trying to understand..
 
You can build a fly cutter with what you have. I built mine and it’s been working great for many years.

Ken, would you mind posting some pictures of your fly cutter ... a great project and a must have tool ... a stout boring bar would be another nice project.

Have fun with your new tool, Civic! A person with a tig, lathe, mill & imagination can be dangerous :)

BTW: Carbide is great when ya have speed, power & rigidity but it's good to practice grinding your own HSS tools. You can quickly create your own shapes and get great finishes in mild materials.
I know you already knew that ... burp
 
Im fine with they way it was done just that ken said it should all be removed at once. Lapping doesnt do that and people lap all the time. Just trying to understand..

His point is that a 3" face mill on a 6" head means that you have to make two passes. Those passes are inevitably not matched to some degree. If you were facemilling something and not finishing it any other way the entire surface would HAVE to be facemilled in a single pass (7" wide cutter for a 6" wide head).

However, since this isn't a 40" long jeep inline 6cylinder head, finish lapping is an option. (obviously it would take a MONSTER machinist stone to lap a 4.0 head) That means that "rough" material removal can be done in any way possible, including two facemill passes as long as they're close enough to the same level to be lapable. These two passes are misaligned by about .001" (just BARELY measurable) but I left more than that before the target depth anyway so it will all come out in the wash anyway.

No worries! Back to the laboratory to finish the jig. Oh and YZ, I was dangerous when I only had a Saw, Chisel, and desire to Destroy. Now I'm practically deadly! MUAHAHAHAHAH!
 
Im fine with they way it was done just that ken said it should all be removed at once. Lapping doesnt do that and people lap all the time. Just trying to understand..

With this head, I simply left some meat for "extended lapping" to take care of those problems. I did indicate it, the stock head (unlapped) wasn't even flat when I got it so I didn't have a "high bar" to hit to begin with.

The "jacking screws" are the vise hold down assembly. They're not touching the head at all, you just can't see that from the angles the pics were taken at. That head did not move one lick even though it is only "pinched" in the vise. I took approximately .006" per "slice" to be easy on it and keep it from trying to kick out.

I wasn't particularly happy with the vise method although it did work and plan on making a custom jig (already in the works at the time of this writing actually) however, in typical fashion, the knobs on top of the head were beaten badly which is why I didn't use those. I expect that many used heads will have the same condition...

My jig is a piece of 2"x5" 3/8" channel I transfer punched all of the head stud holes and spark plug holes down onto. I'm going to drill and tap the head stud holes and drill out and countersink the bottom of the spark plug holes. I'm going to cut studs and lock them to the channel using a jamnut and then install a nut on each of the studs to adjust the "height" of each stud. I'm going to make two spark plug "dummies" for the jig to hold the head down onto the channel. It will take a lot of adjusting I'm sure to get it level (that's what I have an indicator for!) but it won't have to use the (potentially) damaged stock machining studs.

I appreciate the advice, it's better than flying in the dark.

Ken, would you mind posting some pictures of your fly cutter ... a great project and a must have tool ... a stout boring bar would be another nice project.

Have fun with your new tool, Civic! A person with a tig, lathe, mill & imagination can be dangerous :)

BTW: Carbide is great when ya have speed, power & rigidity but it's good to practice grinding your own HSS tools. You can quickly create your own shapes and get great finishes in mild materials.
I know you already knew that ... burp

Amazing how KOR Knowledge is needed. But his name gets drug around as all the "haters" out there just want a piece of his mind!

Only Builder on this or any ATV site, iv'e been on that has made vids of how to's the (proper way), to teach the youngin's, doesn't mean that every back yard mechanic can port his own cylinder or cut his own head properly even with a lathe.
Keep riding the coat tails Koolaid wins!
 
Not only will I show you the fly cutter YZ, I'll show you the entire process. Shot the vid this morning with some help from Tarmo. I'll try to get it loaded tonight. No lapping needed.