DIMWIT parts

YZ Otis

Member
Sep 24, 2007
1,173
104
99
Oregon coast
Freeform stainless or DIMWIT Otis parts (Did It Myself With Inferior Technology) ... figured I couldn't present a ATV for BF approval without a bit of homemade bling (only kind I can afford) and heel guards ( ya know how Awk is :) ) ... LOL ... Here's a couple pics so ya know I'm still workin on my Blaster. Had to take some time out from buildin my barley crusher to make a few Blaster parts.
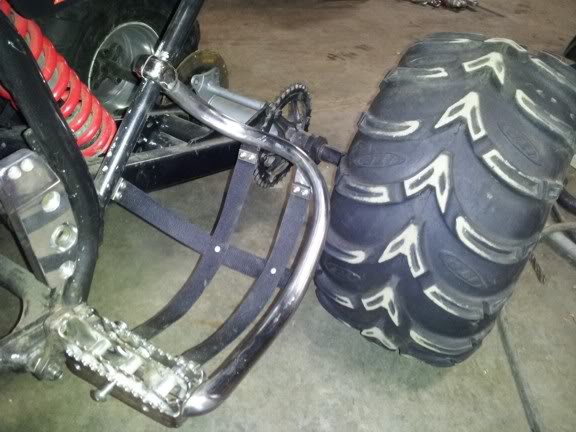
Here's the roughed out ends to the heel guards. They'll be welded to the stainless tubes, clamp to the frame and bolt to stainless peg grips.
~
heelguardends1a.jpg

heelguardends1b.jpg

~
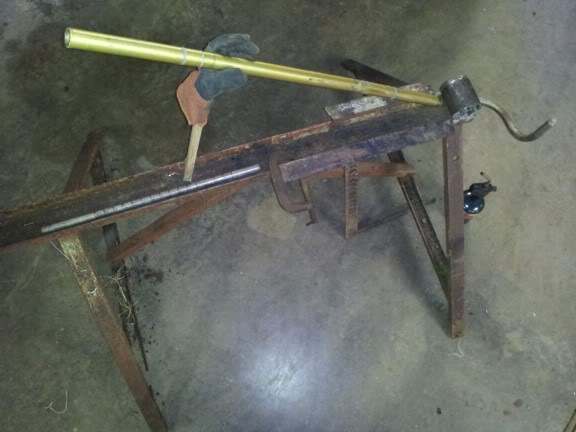
On another note ... I have 2 PC pipes that where susposed to be good for my motor configuration back in the day. The head pipe sections are the same but the expansion chambers have a different taper & diameter. One is like a fatty. This o-ring flange setup should allow me to easily change expansion chambers for testing without having to hack up the frame to bad. That's not sayin I'm afraid to hack & grind things up ... burp ... sweet yellow milling machine, eh :)
~
pipeflange1a.jpg

pipeflange1b.jpg
 
you're luvin that stainless polishing lately !!!!!
but i'm failing to follow what or how they mount, maybe a full pic ????
 
you're luvin that stainless polishing lately !!!!!
but i'm failing to follow what or how they mount, maybe a full pic ????

Very simple assembly but kinda hard to explain ... You can see the right side tube being formed in my fancy pipe bender pic ... The clamp is split after it's welded to the top of the tube so it clamps to the frame ... The bottom piece is drilled & taped on the flat side & bolted from the inside end of the peg ... there should be no visible mounting bolts ... I used black nylon webbing for the baskets to keep it light. There are also some flat stainless pieces that surround the peg by 3/8" making it wider & shinny ... Don't wanna do assembled pics till the bikes done cuz so much of it might fail and it looks like crap till disassembled for final paint ... lol ... just wanted y'all to know I'm still workin on the longest build and haven't given up on Blasters ... Gotta few other little bling things like this to finish up, like a stainless front bumper ... and a couple of major changes that may or may not work out ... testing will tell ... No worries, I'm taking pics & vids whenever I can hold the camera still ... and ya, stainless is kinda fun to work with :)
~
benderjoke.jpg
 
oooooooooooooooooooooooooooooooo love the bender lol


thanks for the updates otis....you have one of my all time favorite blasters on the site
 
Thanks for the kind words guys ... but ... you ain't seen nuthin yet ... lol ... Succeed or fail, I promise it will be interesting ... burp
 
a littleclean up

heelguardends2d.jpg

~
heelguardends2e.jpg

~

Checking fit before welding & adding web mounts ... then some grinding & serious polishing ... burp!
~
heelguardends2c.jpg


heelguardends2a.jpg

~
heelguardends2f.jpg
 
Last edited:
Still pluggin along ... pipe fitting ... I just love hackin up pipes ... LOL ... I think I have enough clearance so I can use either the YZ or Ohlins jug. The taller Ohlins jug kinda complicated things
.
BTW: This isn't just random hacking, I'm tryin to build a better pipe for my application from a few good production pipes but still follow the frame lines & look decent
~
pipefit1a.jpg

pipefit1b.jpg

~
Been collecting up ebay suspension stuff that needs some dimwit parts made to be useful ... tight budget, but it might get interesting ... this poor old frame has been assembled, disassembled, reassembled, cut on, ground on and welded on so much I'm not sure where things belong anymore ... memory fade :) ... burp
~
yzpartsebay.jpg
 
digging your heelguards especially the mounts, you gonna net em or plate em? And also liking the custom yZfs stickers man, looks like it's coming together nicely
 
digging your heelguards especially the mounts, you gonna net em or plate em? And also liking the custom yZfs stickers man, looks like it's coming together nicely

Oh, yah ... Nylon nets are already made up ... I stashed'em away so I don't accidently melt or pitch'em ... lol
~
nets1a.jpg

nets1b.jpg

nets1c.jpg
 
Progress any is a positive! Just went through this thread, looking great I love all the custom work!

BTW- gonna be trying some home brew from a buddy, called old oak stout will be ready for consumption next week!

You still a brewin?
 
BTW- gonna be trying some home brew from a buddy, called old oak stout will be ready for consumption next week!

You still a brewin?

Hahaha, brewin is why my blaster ain't done. Been refining my methods so I'm only dependant on the feed store & local farmers. Don't wanna get regulated or taxed out of my favorite hobby. Beer should always be cheaper than gas :) Let me know how ya like the Old Oak, you may soon be makin your own Molson's!
~
1stbeer008.jpg

Here's my version of stout!
383build012.jpg
 
  • Like
Reactions: pudvah
I once built a shock assembly for my Outlaw Kart. I found a nice adjustable comp/rebound shock but there where no springs available with light enough wire. I'd bought the shock and couldn't just give up on the project so I started thinning the spring. Took some testing but I got what I wanted.
~
2ushockmnt.jpg

~
Dual & triple rate shocks use the multiple springs to get a progressive rate. Shocks are set up for different applications by interchanging springs. Every spacer/separator & coil end takes up spring space. Ya need a long ass shock for long travel with out coil bind.
Since I'm such a cheap old fart I decided to do my own taper ground progressive springs.
From my point of view, if I can change the valving & customize the spring rate it would be hard for any manufacturer at any price to give me a better ride by just knowing my weight & bike setup.
Phragle said it looked like I needed a little more sag even with the preload backed off so I started with that.
I'm sure it's wrong and I don't recommend anyone trying this ... but ... if anyone has a 400ex/kfx shock spring layin around collecting dust, I could use some donors so I can try different tapers ... :) ... would also be interested in stock yfz450 front springs.
~
This shows the grinding area. The grind scratches where polished off to reduce stress points.
taperspring1d.jpg

I took off .060 at the thinnest part on this grind ... .060 is a big whack, doesn't look like much but makes a huge difference and you could easily ruin a spring going a bit too far
taperspring1c.jpg

taperspring1b.jpg

taperspring1a.jpg

...burp
 
Last edited:
Hahaha, brewin is why my blaster ain't done. Been refining my methods so I'm only dependant on the feed store & local farmers. Don't wanna get regulated or taxed out of my favorite hobby. Beer should always be cheaper than gas :) Let me know how ya like the Old Oak, you may soon be makin your own Molson's!
~
1stbeer008.jpg

Here's my version of stout!
383build012.jpg

Hey Otis, Just drank that home oak brew, damn, that was a strong dark (guinness style)brew. can only get one of those down a day! Back to my lighter side now! No brewing for me, That's like porting, I'll leave that to the experts!

BTW- Nice shock setup!