The splice looks really good.
I misread what you said about the frames. I understand now...pics really do help!
ATV Riders Forum - gusset kit
this thread shows a custom gusset set. TPRusa also sells a full frame gusset set for the blaster if you can stand the spider web theme.
The gusset plates are $89 but the "installation kit" is an additional $350. I'm not even sure what an installation kit is... maybe it's the instructions, who knows. LOL
You can make your own though, 1/8" plate steel and a careful hand can cut out a whole lot of gussets. My local Ace Hardware has a wide selection of steelworks products and while they're not very economical if you need much at all, they are very convenient for a very small project. They carry 1/8" x 3" x 36" plate. It's about $15 for the plate but it would be enough to do at least one whole quad in gussets. A port-a-band (or saw-z-all with a metal cutting blade) and an angle grinder can make some pretty gussets if you have the patience for it.
 but yours sounds like it's got a gun on you and is holding your wallet hostage I:I
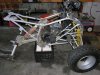
 I'm pretty sure that by looking at their pics and the pic I found here on BF, I'm gonna make my own. I'll just cut out some cardboard to check the fits on the frame for each one and then transfer and start cutting and filing and filing and filing and filing........
  remaining pics)
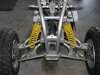
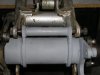


") I found a place that'll make the "washers" custom but they're pricey.
I found a place that'll make the "washers" custom but they're pricey.