1st Blaster, full rebuild

garbuttjr123

New Member
Feb 8, 2014
22
6
3
47
New-b here. Been looking around the forum for a few months and have read a ton about my 1st Blaster. Looking forward to jumping into blasty-bliss with all you guys.
Heres the long story(SORRY:)):

I 1st laid eyes on the first Blaster when my cousin got one in the late 80's. Loved its racy style. I always had 2-stoke dirt-bikes and loved them-Yamaha was what I had had mostly. Never owned a quad till this Blaster.

I have a nephew who I got onto dirt bikes a few years bike and after 3 upgrades, he finally entered his 1st competion on a XR70. It was a rainy(and messy) day full of worries, but he did great. He had a fellow in the pits offer him to take his quad for a ride and he was hooked. So began the quest of finding him a quad. I had never had one(had 3 wheelers, though...), and thaught I'd get something to call mine, but tell him he could ride it anytime he wanted. I knew I wanted a 2 stroke, somethiing popular, and something affordable. I picked up a beat up blaster for a few hundred bux and so the journey began.
The 96(?) Blaster(drum front, rear cable) I baught was running(rough), and has an extended axle, Maier race front plastic, Snyder +3, +1 a-arms, and a rebuilt motor w/a stock stroke Vito's crank, fresh topend(.80 over), and aftermarket CPW carb,. Douglass aluminum rims w/RAZR tires all around, FMF pipe + silencer, WORKS front tripple-rate shocks in the front w/remote rezzi's(banshee, I believe), and a 400EX rear shock.
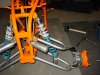
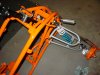
I didn't get any pictures of it before I disassembled it, but have had a few since I started the project of a complete tear-down. I easily found a local guy(w/in a mile of work) that parts out blasters, so anything I needed was well within my grasp, and he is a great guy and has super-fair prices too...

1st problem: Broken engine mounts. Front and bottom-welded numerous times(unattractively too I might add...). Also had the right peg break off the frame and same yahoo booger welded that up, too.

Got another frame from the partsguy. did a disassembly, but before-hand I started the engine and let it warm up and it ran good, but was kinda noisy. I took the clutch-side cover off and found the balancer gear had come apart. Ebay solved that delima + I believe this is why the engine mounts were broken in the past(it shook like the heavens when I reved it up...).

I have encountered several other issues I will add later cuz I think this read is long enough for now.

Pictures to come(if I can figure it out!).

Glad to clime aboard! Everyone seams very knowledgeable, and I have read some great posts here with excellent advice. More to come!
 
Last edited by a moderator:
  • Like
Reactions: cbaber
Sounds like you have a very good foundation to build from. If you have a running motor and good suspension the rest will be fairly cheap. Do yourself a favor. If you have $150 to spend right now. CHeck the for sale section. Young guns racing is selling a complete front hydro setup.
 
  • Like
Reactions: blasterdemon7
2-9-14 017.jpg
I've bn working a crapload of hours. Yesterday was my 1st day off in 20 days. I did get the front together, and I am going to attempt to post a few pics of it so far... I know the color is bold, but I like being unique...
The reason I took these particular shots is I ran into trouble right off the get-go here. When I got this the camber was way in at the top of the wheels and there was no more adjustment in the upper ball joint(they were adjusted all the way out & still too much noticable camber). I figured maybe the frame wass tweeked so was wainint to start throwing parts onto the new frame to see if the problem may correct itself. Anyway, when I went to throw the spindles on, I noticed the left spindle had the tip of the threads broken off. Never noticed it even after painting cuz they filed/ground it down nice. If it were on the right, I woulda thrown a lockwasher on it and been comfortable, but since it was on the left and the wheel spins in the direction to loosen the hub nut(go-kart days memories), I decided to goto partsguy and get another spindle. Well, I got it all painted and went to throw things together and noticed the spindle he sold me was made different. I searched(not super in depth) and found most were all like the one he sold me. The difference is the bottom ball joint. Mine HAD a pinch bolt on the top and bottom, the replacement I got accepted a tapered seat ball joint. I got another from partsguy for the right and ended up ordering new ball joints that had tapered seats. With all the overtime I work, it kinda set me back almost a week.
What years had the double-pinchbolt, drum-brake spindles and why did they change things???
There is more to the rebuild saga, but thats all for now...
Thanks for the warm welcome! I look forward to being a long-term member!
Hope the pics load!
 

Attachments

  • 2-9-14 018.jpg
    2-9-14 018.jpg
    688 KB · Views: 243
  • 2-9-14 019.jpg
    2-9-14 019.jpg
    697.6 KB · Views: 237
  • Like
Reactions: Awk08
damn nice work so far !

it was the 88/89's that had the double pinch bolt ball joints/spindles.
1990+ have taper/castle nut lowers and pinch style tops.
not sure about why the change, but they also added the heelgaurds starting in '90
 
Sounds like you have a very good foundation to build from. If you have a running motor and good suspension the rest will be fairly cheap. Do yourself a favor. If you have $150 to spend right now. CHeck the for sale section. Young guns racing is selling a complete front hydro setup.

Good advice on getting front hydro brakes. If you can't buy a complete front hydro brake setup with spindles , Ken OConner racing sells custom front spindles to bolt on a hydro brake setup. Top off the brake system with awk08 rear GSXR brake setup and have awesome stopping power thats there when you need it.
 
5.jpg
1.jpg
3.jpg
4.jpg
2.jpg
Off topic, but the first pic is of my new Terrain I baught yesterday. I never thaught I would ever be able to buy a new car. Not braggin, but I am proud of it, i guess..anyway...
I figured I wouldn't be able to get anything done with work and all goin on this week(workin 10 hr shifts, sat & proly sundday and class 2 nights this week). Figured I'd better get out in the garage and get some stuff bolted up, so I went to work on the rear. I had to get another shock cuz the one that this quad came with was blown. Musta been a different year cuz the rezzi is more centered on the upper shock body...not sure I had to grind off that frame mount, but ooh well, i guess. I painted the spring on the origional shock when I did the frame and all the other parts. I used my uncles body shop and got a gallon of PPG single stage acrylic enamel in sunburst orange(ebay-$15 shipped). The color will look even brighter once it it gets out of the dark garage. The pics don't do it justice. Anyway, I had to get another shock and even the spring is a different diameter. I had to paint this one so I did it at work with some Velspar Tractor enamel in a rattle can in Allis Chalmers orange that was leftover when I restored an 84 Honda CR250 a few years back. Thats why the shock is a tad different shade. I may pull it back off and mix up some PPG and re-spray the spring, i dunno...
Everything is comming together. It is mostly loose till I can get the engine back in and tie rods, wheels, & wiring. Then I can start goin around tightening it all up. I got some work to do on the rear fenders. The front is black maier race plastic. The tank cover is black also. The rear was blue before it was painted black and stickered all up. Cant find a good set of black fenders, tho. Sux cuz mine are nice, just the one common 4 inch crack under the leftside of the seat...anyone got a set they'd sell me?(hope I aint breakin no rules.)
Another small issue-the rear axle has the adjustable collars. The 1 inch collars were behind the hubs and the smaller ones outside the hub behine the castle nut when I got the blasty. Never noticed, but one of the smaller collers musta been lost and someone put one of a different size on it, so there is 2 different sizes of the smaller collar. I'm pretty sure its the larget of the 2 that doesn't belong, so I will take it to work along with the other and have the tool room machine to the size of the other. No biggie, just another set-back...
Long reply, but just wanted to add that I do intend on getting hydros all around eventually. With time not being on my side and having everything to get this thing going instead of a pile of parts strewn all over the place, I had to throw it together with what I had. I can add anything later on, which is what I already planned on doing. I have never rode this thing, and I am getting ancy!(not too much, tho. Its been mostly in the single digits or less here in NE Ohio since new-years eve!!!)

1.jpg 3.jpg 4.jpg 2.jpg
1.jpg
5.jpg
1.jpg
5.jpg
 
thats the color i was going to do on my blaster. now i have to change my color choice...lol
 
Workin a heep, and have found little time for the blaster. I did manage to get the engine all back together and now I am ready to paint it...
What color should I go with? Silver or black? Opinions, please.
I will add some pics of the few things I have done in the next day or so.
I did take my replacement stock pegs to work, along with the ones left from the frame that had them welded on(used a torch for easy removal). I ended up cutting the old ones off the mounts and splitting them down the middle and welding the halves to the front and back of the replacements. Then added a fresh coat of black paint. I have pics of those in my truck, and will grab them and post them before I leave for work in the morning(yes, I gota work this saturday as well...)
Let me know what you guys think of the engine color and any reasons why you'd pick one over the other...
Thanks
 
OOh, I just remembered another Q' I wanted to ask. I was curious about camber and toe adjustment. Any suggestions on a good starting point of what degrees camber and toe in or out would be very helpfull. Lemme know what you guys are running. Thanks again.